The expense page
Clicking a claim in the list opens it on the right of the screen, so you can move between claims without leaving the list.
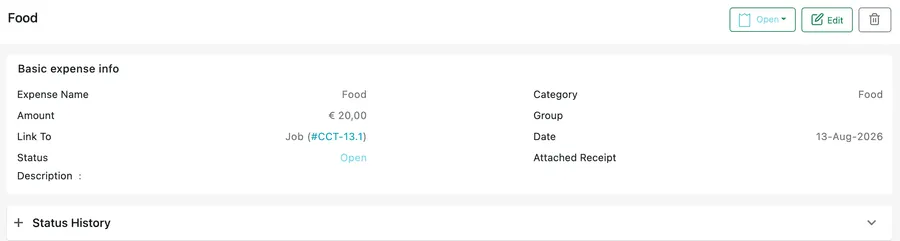
Expenses → a claim
Basic expense info
Section titled “Basic expense info”
Expenses → a claim → Basic expense info
Everything recorded on the claim sits in one block:
| Field | What it tells you |
|---|---|
| Expense Name | What the money went on |
| Amount | What it cost |
| Link To | The job or client the cost belongs to. A job shows as its job code and opens the job when clicked |
| Status | Where the claim has got to — see approving and paying an expense |
| Description | Whatever detail was added with the claim |
| Category | The kind of spend |
| Group | The group it was filed under, if any |
| Date | The day the money was spent |
| Attached Receipt | The receipt uploaded with the claim. Empty here means nobody attached one |
Status History underneath keeps every status the claim has been through.
Changing a claim
Section titled “Changing a claim”
Expenses → a claim → the action buttons
Three buttons sit at the top right:
- The status dropdown — labelled with the status the claim is on now — moves it to Approved, Reject or Paid. See approving and paying an expense.
- Edit reopens the claim in the same form it was created in, with everything already filled in. Change what needs changing — a corrected amount, a category that was wrong, the receipt somebody forgot to attach — and Update saves it.
- The bin deletes the claim, after a confirmation. It goes from the list, from the job it was linked to and out of that job’s profit figure. A claim that was made in error is worth deleting; one that was turned down belongs on Reject, where it stays on the record.