How requests work
A request in EyeOnTask is the record of work someone has asked for, before it is committed to. An enquiry, a support ticket, a customer query, a sales lead — whatever your business calls the thing that arrives first, it is a request until it becomes an appointment, a quote, a job, an audit or a contract.
A request holds who asked, what they want, when they would like it, where they came from and anything they sent you. From there it is the place you act from: everything you raise off the back of it stays attached to it, so one screen carries the whole story from “someone rang about their air conditioning” to the invoice.
Because different businesses take in different kinds of work, the form a request is raised on is yours to build — one for enquiries, another for tickets, as many as you need. See request forms.
Requests are an Advance plan feature. See plans and pricing.
The short version of the process
Section titled “The short version of the process”- It arrives — from your reception desk, a manager, the scheduler, the client portal or a form on your own website. It lands in the list as New.
- What was asked for is written down — client, services, the time they would prefer, how they came to you, the problem, any photos. Nothing is scheduled and nobody is assigned yet.
- Someone decides what it needs — a visit, a price, the work itself, an inspection, or an ongoing agreement. All of it is raised from the + on the request.
- Everything joins the timeline — the request starts it, and the quote, the job, the parts and the invoices all join it as they happen. The same chain then shows on the quote, the job and the contract as well.
- It gets closed — with the status you use for won, lost or simply finished. The record stays.
The life of a request walks this through properly, with a worked example. The rest of this page is the screens themselves.
Finding your requests
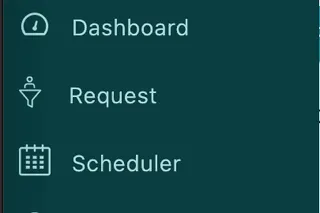
Section titled “Finding your requests”Request on the main menu is the way in — the second entry, under Dashboard.
Main menu
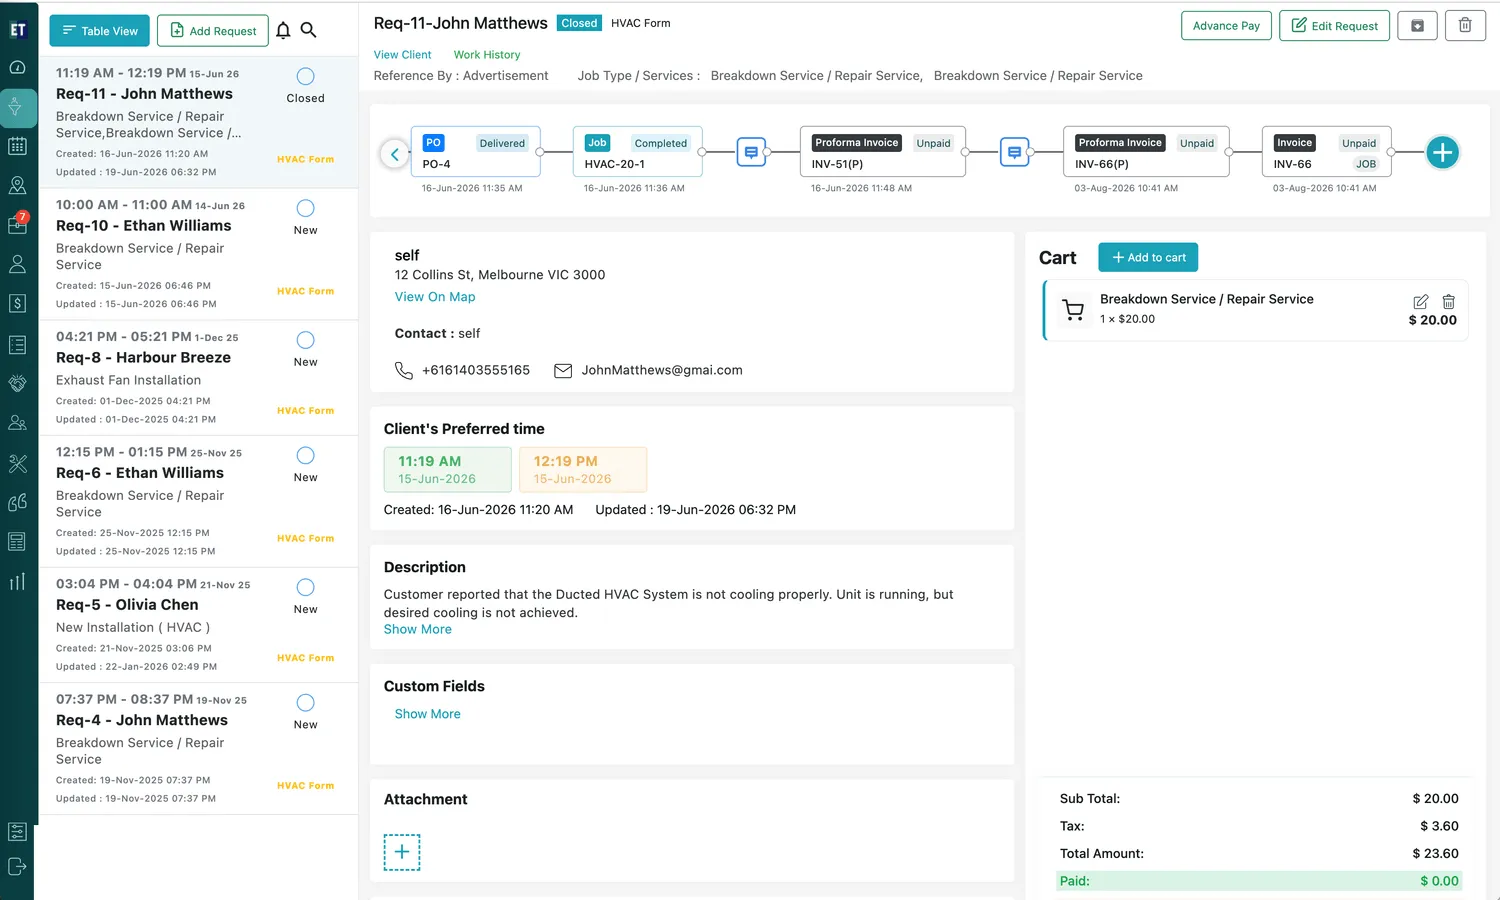
The list is drawn two ways, and the button in the top-left switches between them — it is labelled with the view you are going to, so Table View takes you to the table and Simple View brings you back.
Simple View is where you work. The list runs down the left, and clicking an entry highlights it and opens the whole request alongside, on the right — so you move between requests without leaving the list.
Request → Simple View
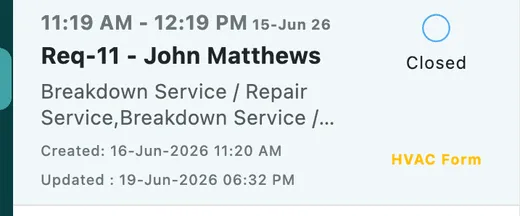
Each entry in that list is a summary of the request:
Request → Simple View, one entry
- The time slot and date across the top are the client’s preferred time.
- Req-11 - John Matthews — the request’s label and who it is for.
- The services asked for, then Created and Updated timestamps.
- On the right, the status and, under it, the name of the form the request was raised on.
The bell icon beside Add Request shows request notifications, and the search icon opens a search box over the list.
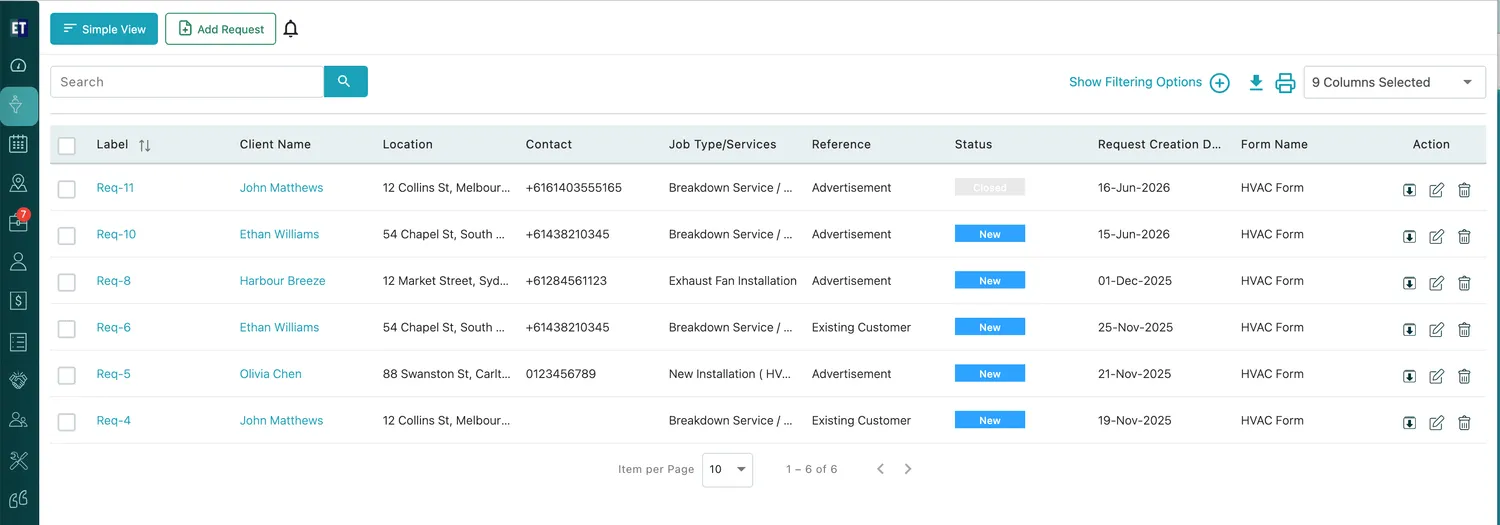
Table View drops the panel and gives you the list on its own — one row per request, sortable and searchable:
Request → Table View
The columns are Label, Client Name, Location, Contact, Job Type/Services, Reference, Status, Request Creation Date and Form Name. The arrows beside a heading sort by it, and clicking a label or client name opens that record.

Request → Table View, toolbar
- Search finds a request without scrolling.
- Show Filtering Options opens the filters for narrowing the list.
- The download and print icons take the list itself — not one request — out of the app.
- 9 Columns Selected chooses which columns are drawn.
- The tickboxes down the left select rows to act on together, and Item per Page controls how much of the list you see at once.
Each row’s Action column has a download icon, a pencil for editing and a bin for deleting. Add Request, top-left, sits in the same place in both views — see creating a request.
Reading a request
Section titled “Reading a request”A request looks the same wherever you open it — as the right-hand panel in Simple View, or on its own page from the table.
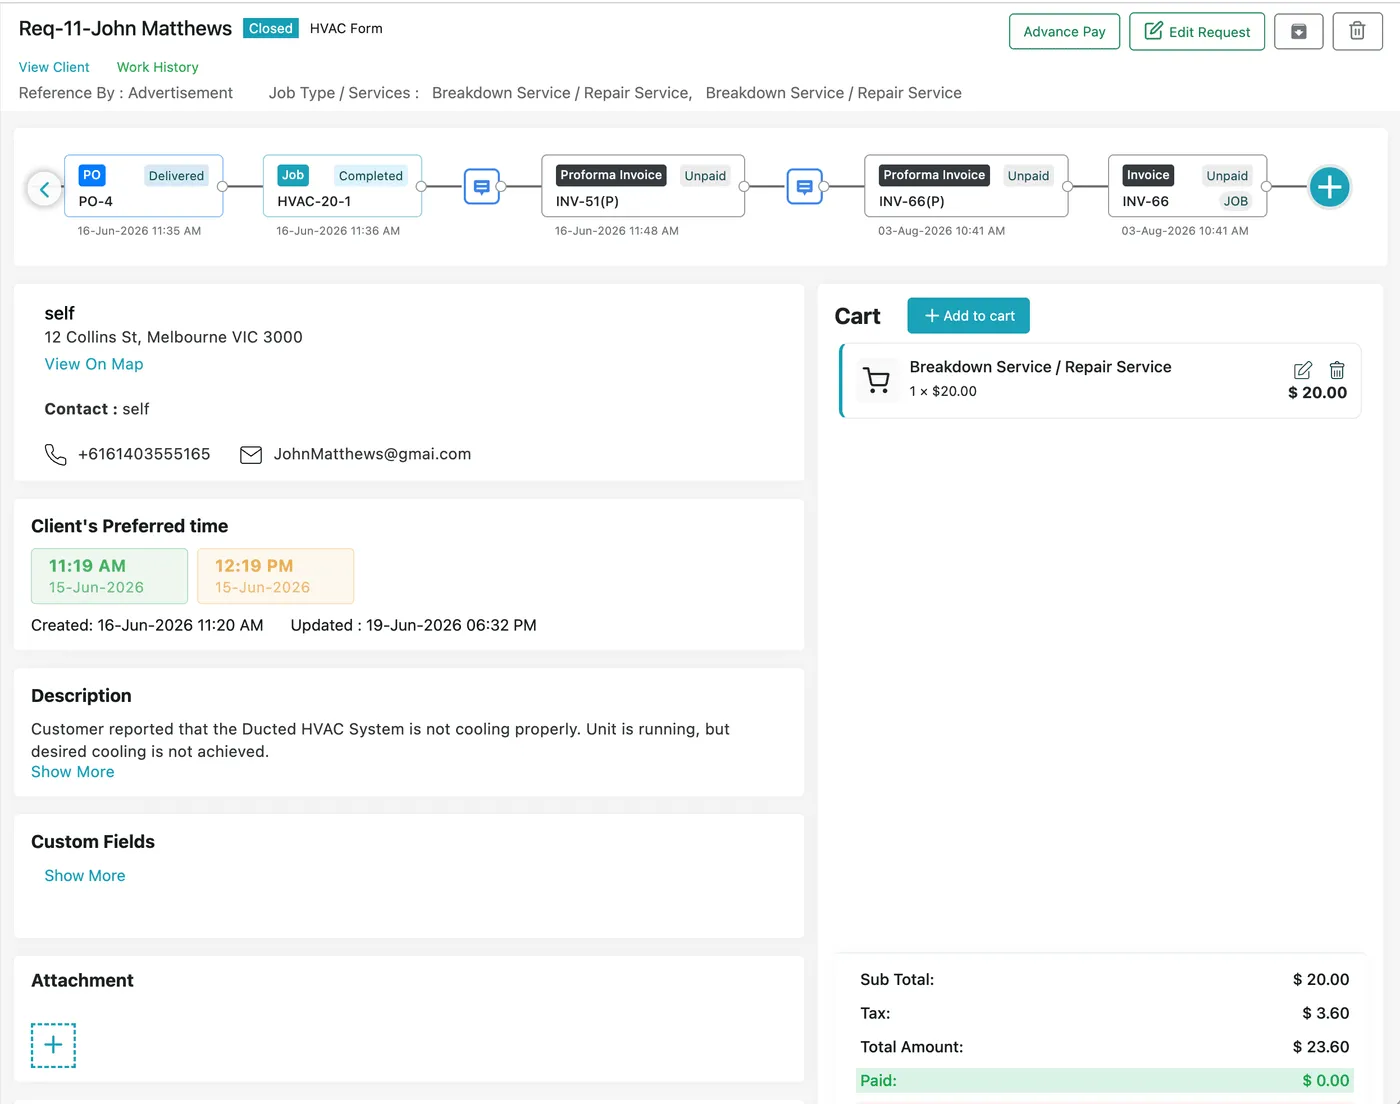
Request page, full view
The header
Section titled “The header”The request’s label and client name title the page, followed by its status and the name of the form it was raised on. Under that:
- View Client opens the client’s record; Work History opens the history of work done for them.
- Reference By is how this client came to you — advertisement, existing customer, or whichever sources you have set up.
- Job Type / Services lists everything being asked for.

Request page → action bar
The actions, from the left, are Advance Pay for taking a deposit, Edit Request, download, and delete.
The timeline
Section titled “The timeline”
Request page → timeline
The strip at the top is the timeline. It answers one question: what happened, in order, and what came out of what.
The request itself is the first card on it. Creating the request starts the timeline; from then on everything you do goes onto it — the quote you raise, the appointment you book, the job, the purchase order, the invoices — each card showing what it is, its own status, its code and the date it was created, oldest first.
The example above is scrolled forward, running from a purchase order through a completed job and two proforma invoices to the final invoice; the chevron at the left goes back to the earlier cards, and to the request that started it. The speech-bubble icons between cards are comments and messages.
The same timeline follows the work into every module. Open the quote, the job or the contract that came out of this request and the strip at the top of it is this same chain — so wherever in the chain you happen to be standing, you can see the whole of it without going looking for the request.
The teal + at the end is how you act on the request — appointment, job, quote, audit, contract or comment. See acting on a request.
Client, preferred time and description
Section titled “Client, preferred time and description”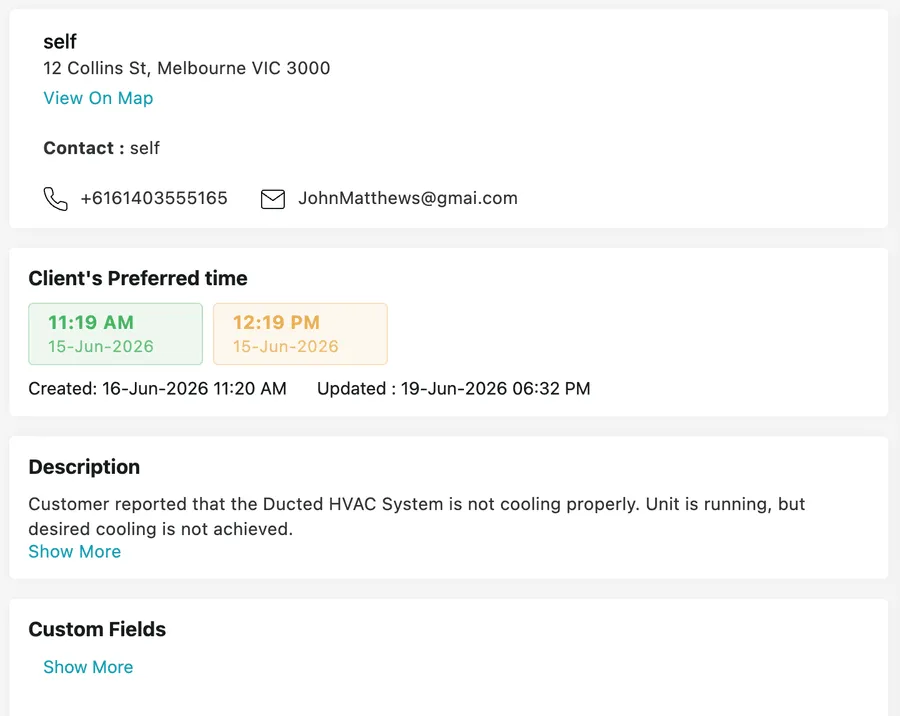
Request page → details
- The first card is the site and contact: site name, address, View On Map, and the contact’s name, phone and email.
- Client’s Preferred time is the window the client asked for — start in green, end in amber — with the request’s Created and Updated timestamps beneath it.
- Description is what the request is about, with Show More for the rest of a long one.
- Custom Fields holds whatever extra fields your request form adds.
- Attachment, at the bottom, holds anything sent with the request; the + tile adds more.
The cart and totals
Section titled “The cart and totals”Down the right is the Cart — the services on this request with a price against them — and, under it, Sub Total, Tax, Total Amount and Paid. This is where a deposit taken on the request shows up. See the cart and advance payment.
Request statuses
Section titled “Request statuses”A request’s status is largely your own. New, On hold and Closed come with EyeOnTask; you add the rest — working, quoted, won, lost, whatever your intake actually looks like — each with its own colour. See request statuses.
You set the status on a request from the Status dropdown in the footer of Edit Request:

Edit Request → footer
The status shows beside the request’s label on the request page, on its entry in Simple View, and in the Status column in Table View.
Where to go next
Section titled “Where to go next”| Page | What it covers |
|---|---|
| The life of a request | The whole process, stage by stage — who touches it, what it turns into, and a worked example from enquiry to invoice |
| Where requests come from | The ways a request reaches you — reception, a manager, the scheduler, the client portal and your own website |
| Creating a request | The Add Request form — client, services, preferred time, reference, description and attachments |
| Taking requests from your website | Putting the request form on the client portal and embedding it in your own site |
| Acting on a request | Turning a request into an appointment, job, quote, audit or contract |
| Comments and messages | Private notes for your team and messages to the client |
| The cart and advance payment | Pricing the services on a request and recording a deposit |
| Editing and deleting a request | Changing a request, setting its status, and what stops one being deleted |
| Request forms | Building the form a request is raised on, and adding your own fields to it |
| Request statuses | Creating the statuses your requests move through |
| Questions and troubleshooting | Requests that will not delete, client details that will not change, missing statuses |
Settings behind this module
Section titled “Settings behind this module”- Request settings — Request numbering, and where the form builder and status list live