Attendance and check in
Attendance is the shift. A fieldworker checks in on the mobile app when they start the day and checks out when they finish, and the Attendance tab is where those times are read back.
Checking in and out needs a live connection, unlike the rest of the app, which works offline and syncs later.
It is the hours a person was at work, not the hours they spent on jobs — for that, see worklog and timesheets. Attendance is what a salaried employee is paid for, which is why the month’s salary is worked out on this screen.
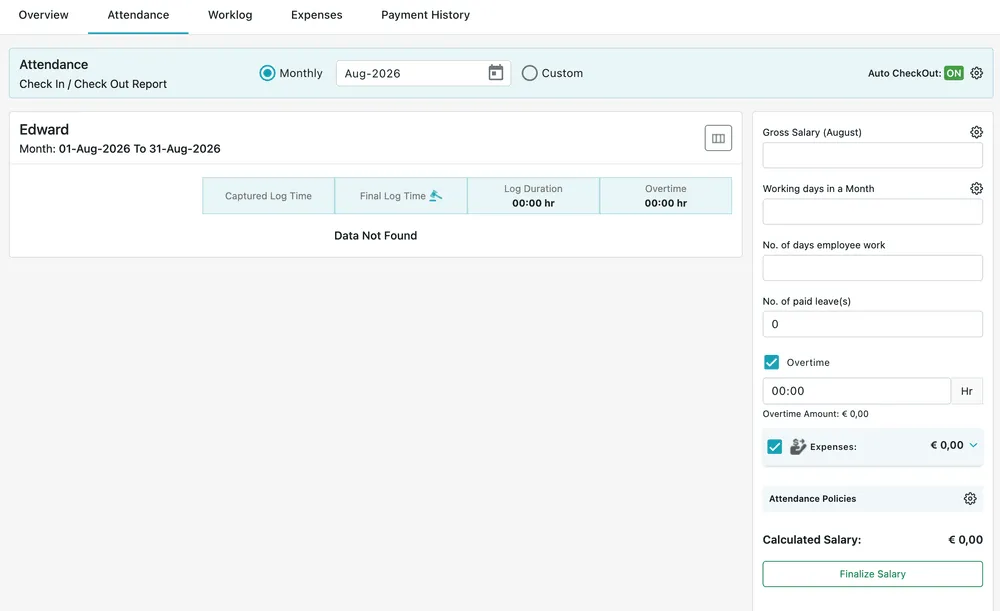
Users → a user → Attendance
Checking in does not need a job
Section titled “Checking in does not need a job”Attendance and job assignment are separate things. A fieldworker can check in with nothing assigned to them at all — the app’s Check In starts their day, and whether there is work on it is a different question. The day is recorded, and it counts as a day at work in the salary calculation below, the same as any other.
So somebody on standby, somebody whose jobs were all cancelled, and somebody sent out with a full list all check in the same way.
Choosing the period
Section titled “Choosing the period”
Users → a user → Attendance
- Monthly with the month picker beside it reads one calendar month, and is the setting to use when you are about to pay someone for it.
- Custom takes a start and end date instead, for a fortnight, a week, or the four days somebody worked before they left.
Auto CheckOut in the top-right corner shows whether automatic check-out is on for this person, and the gear beside it opens the attendance policies where it is set. With it on, a day where somebody forgot to check out is closed off for them at their shift end time rather than being left open — see auto check-out.
The report
Section titled “The report”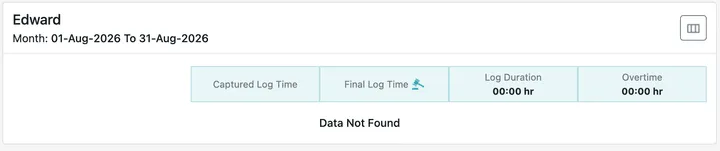
Users → a user → Attendance
The report lists the days in the period with, for each one:
- Captured Log Time — the times the app recorded, before any policy is applied. This is the column an edit changes when a day is corrected.
- Final Log Time — those times after the attendance policies have been applied: rounded to the interval, adjusted for the grace period. This is the figure the day is counted on.
- Log Duration — how long the person was checked in.
- Overtime — the part of it that falls beyond their shift.
Keeping both columns means the timing survives the rounding. If somebody queries a day, the time that went in is still there beside the time they were paid for.
Data Not Found means there are no check-ins for the period — the month has not happened yet, the person did not work it, or they never checked in.
Correcting a day, and what cannot be undone
Section titled “Correcting a day, and what cannot be undone”Attendance is corrected by editing it, on the Attendance tab of the person’s own record — the same screen the report is read on. Pick the day’s row in the Check In / Check Out report and edit its time. Somebody who checked in an hour after they arrived is put right here rather than being argued about at the end of the month.
An edit changes the Captured Log Time, not the Final Log Time. You are correcting what the app recorded, and the attendance policies then run over your corrected figure the same way they ran over the original — so the day is rounded, graced and counted from the time you put in.
There is no delete. An attendance record cannot be removed, only corrected. A day that was recorded stays recorded, which is the point of it as a pay record: the month somebody is paid for is the days that were logged, not the days that survived a tidy-up. If a day is wrong, edit it.
Correct the attendance before you finalise the salary, because the figure is worked out from what the report says on the day you close it off.
Working out the month’s salary
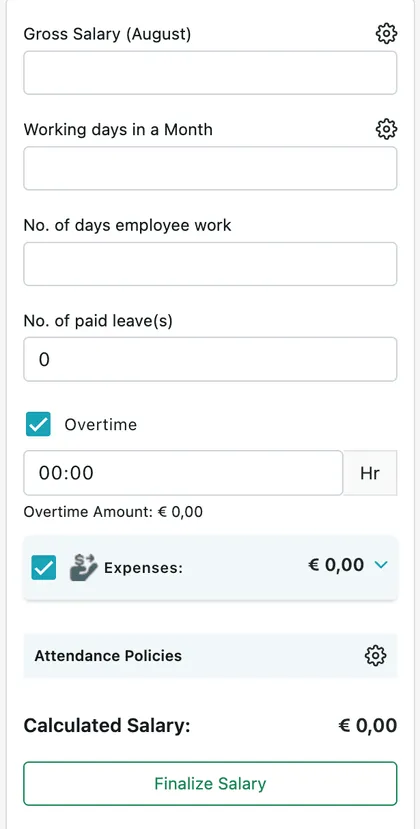
Section titled “Working out the month’s salary”The panel down the right side turns the attendance into a figure.
Users → a user → Attendance
- Gross Salary for the month, which is the person’s pay before anything is worked out from it. The gear beside it opens where the wage is set.
- Working days in a Month — how many days the month is expected to contain, so a day is worth the right fraction of the salary. The gear beside it opens where that is set.
- No. of days employee work — how many of them they actually worked, filled in from the attendance above.
- No. of paid leave(s) — days off that are still paid, so they count as worked.
- Overtime, with the hours and the amount they come to. Untick it to leave overtime out of this month’s pay.
- Expenses, with the total of the claims for the period. Untick it to pay the claims separately rather than with the salary. The chevron opens the claims themselves — see a user’s expenses and leave.
- Attendance Policies opens the rules the hours were counted under — see attendance policies.
Calculated Salary at the bottom is the result: the salary for the days worked, plus overtime and expenses where they are ticked.
Finalising the salary
Section titled “Finalising the salary”Finalize Salary closes the period off. The figure stops being a live calculation and becomes a record: it moves to the person’s Payment History, where it sits as unpaid until the money goes out and it is marked paid — see paying a user.
Finalise a month once you are satisfied the attendance behind it is right, because the calculation is only as good as the check-ins it read.