How settings work
Settings is where EyeOnTask is shaped to your business. Almost nothing in it is day-to-day work — it is the place you go once, when you are setting up, and then only when something about the company changes.
Most of what lives here is the same idea repeated: the lists behind the dropdowns. When you pick a job type on a job, a client type on a client, a brand on a piece of equipment or a payment mode on a purchase order, you are choosing from a list that somebody filled in under Settings. Those lists ship with sensible entries, and you edit them to match the words your business actually uses.
The rest is defaults (what a new record starts out as), documents (what an invoice or job card looks like when it is printed), and connections (the mobile app, the customer portal, your accounting package).
Finding it
Section titled “Finding it”Settings is at the foot of the main menu, above Logout.

Main menu → Settings
The eight sections
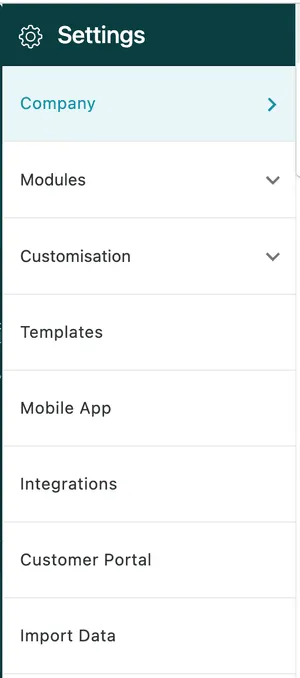
Section titled “The eight sections”Settings opens with its own list of sections down the left, and that list stays there as you move around.
Main menu → Settings
| Section | What it holds |
|---|---|
| Company | Who you are — your address, currency, time zone, tax registration numbers, branches, working hours and language. Also your own password. |
| Modules | One entry per module — Clients, Work, Invoice & Accounts, Inventory, Quotes, Contract, Expenses, Equipment, Purchase Order, Request, User. This is where the lists and the numbering defaults for each module live. |
| Customisation | Fields and forms you invent yourself: custom fields, the job completion form, additional forms and equipment remark forms. |
| Templates | What your documents look like and what your messages say — invoices, job cards, quotes, and the email, SMS and WhatsApp your customers receive. |
| Mobile App | What fieldworkers can see and do in the mobile app, set for everybody at once. |
| Integrations | Connections to accounting packages and payment processors — QuickBooks, Xero, PayPal, Stripe, Zapier — the SMS gateway, and Developer API, where the Super Admin generates API keys. |
| Customer Portal | The site your clients log in to, and how it looks. |
| Import Data | Bringing clients, items and other records in from a spreadsheet, or handing your raw files to the team — see assisted import. |
Modules and Customisation expand when you click them; the other six open straight away.
Two ways to reach a list
Section titled “Two ways to reach a list”You do not always have to come to Settings to add to a list. Many of the forms carry an Add link beside the dropdown — Add Client type on the client form, Add Job Type/Services on the job form, Add Brand on the equipment form. It creates the entry without leaving what you were doing, and it goes into the same list you would have edited here.
Use the form link when you are mid-flow and the value you need is missing. Use Settings when you are setting the lists up, or tidying them.