Items and services on a job
Anything the client will be charged for goes on the job as a line — a part fitted, a service performed, labour spent. Those lines are what the invoice is built from later, so putting them on the job as the work is planned or done means the invoice raises itself.
There are two moments to add them: in the cart while creating the job, and on the Item / Invoice tab once the job exists. Both write to the same list.
The cart, while creating the job
Section titled “The cart, while creating the job”The cart at the bottom of the Create New form is for what you already know the job will consume. It reads as an instruction to the fieldworker as much as a price: this is the work, and this is the material to fit while you are there.
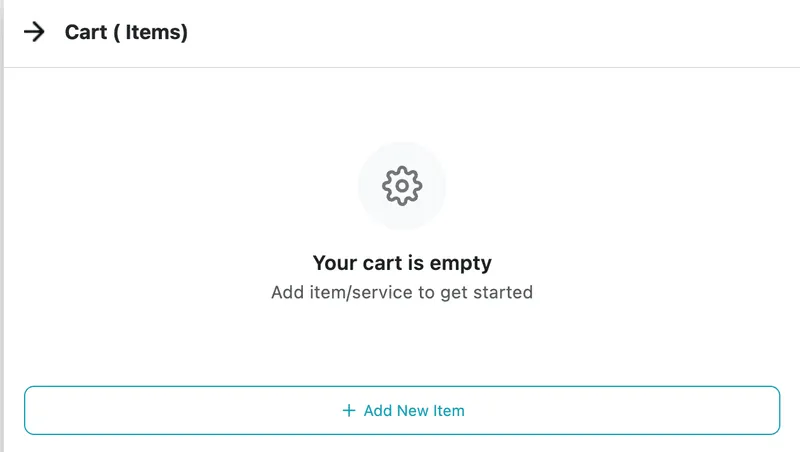
Create New → Job → Cart
Add New Item opens a small form with an Item and a Service side.
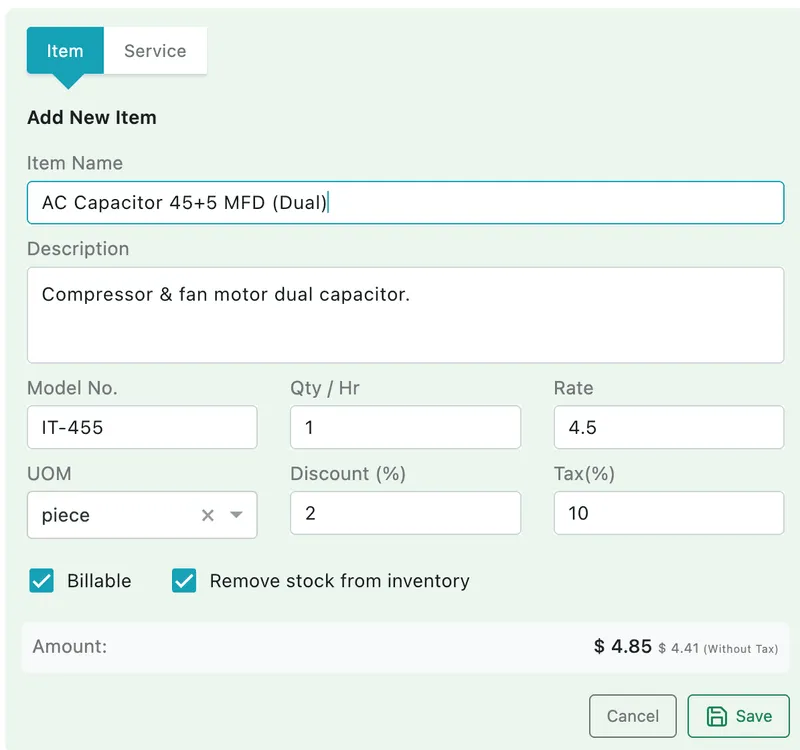
Cart → Add New Item → Item
An item is a physical thing — a capacitor, a filter, a length of pipe.
-
Item Name and Description say what it is. Model No. pins down which one.
-
Qty / Hr and Rate give the quantity and the unit price; UOM is the unit it is counted in — piece, metre, litre.
-
Discount (%) and Tax (%) apply to this line, and the Amount underneath shows the result both with and without tax, so you can see what the tax is doing.
-
Billable decides whether the client pays for it. Untick it for anything consumed on the job that you are absorbing — a goodwill replacement, a part covered by warranty. The line stays on the job as a record of what was used; it just does not reach the total.
On a job under a contract this tick also moves the free quota. A line the client is not charged for is what the allowance is for, so it uses a unit; make the line billable and that unit goes back to the contract.
-
Remove stock from inventory takes the quantity out of your stock when the job saves, so fitting the part and depleting the warehouse are one action rather than two. It is ticked by default, alongside Billable — untick it for a line that should not touch your stock.
Adding a non-consumable here brings up a Smart Suggestion, asking whether the item should become a piece of equipment. Say yes and the unit is created as you write the job, with its parts if it has any.
Services
Section titled “Services”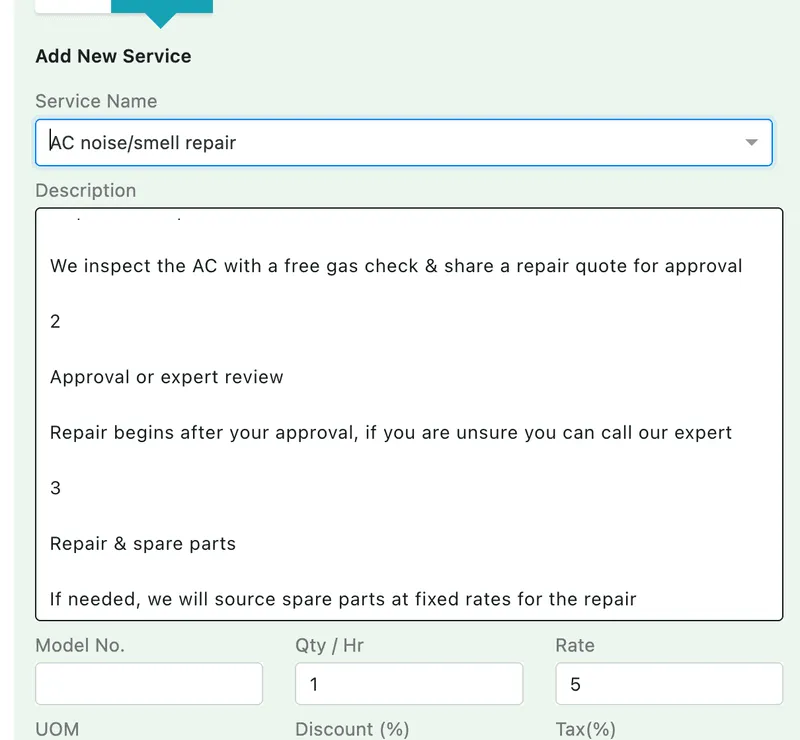
Cart → Add New Item → Service
A service is labour or a defined piece of work rather than a thing. Pick the Service Name from your existing list and its standard description and rate come with it, so a repair you sell every week is priced the same way every time. Qty / Hr here is usually hours.
Save puts the line in the cart, and the running Total Amount at the foot of the cart updates.
The Item / Invoice tab, afterwards
Section titled “The Item / Invoice tab, afterwards”Once the job exists, the same lines live on its Item / Invoice tab — and this is where most lines are added, because most of what gets used is only known once someone is on site.
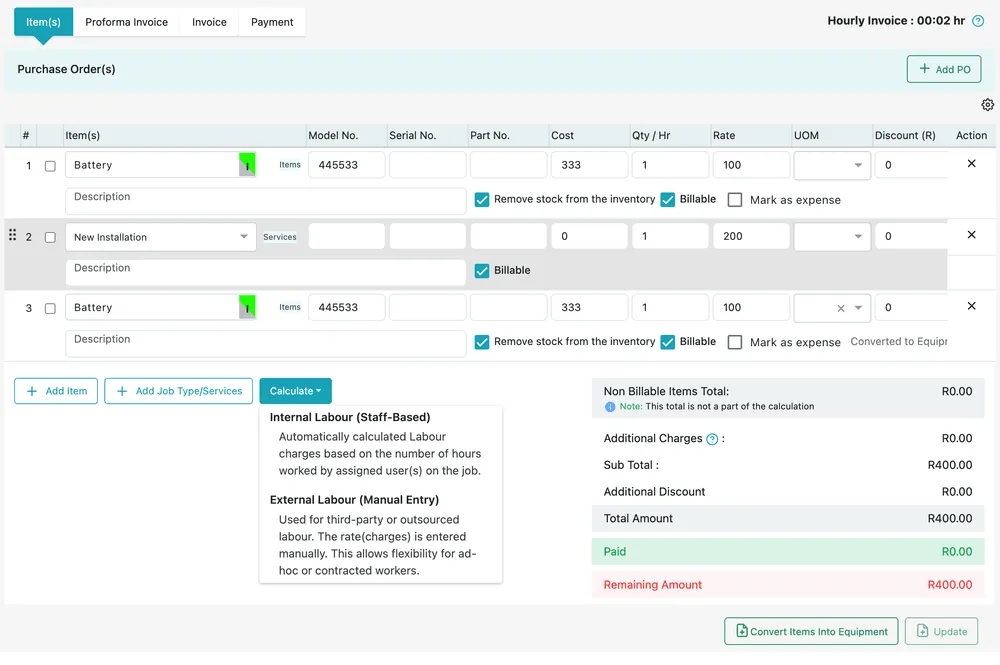
Job page → Item / Invoice
The tab has four sub-tabs:
| Sub-tab | What it is for |
|---|---|
| Item(s) | The lines — what the job is charged for. The rest of this page |
| Proforma Invoice | The figures on paper before there is anything to bill. A proforma is deliberately left out of what you are owed — see proforma invoices |
| Invoice | The invoices raised from this job — see invoicing from a job |
| Payment | Money received against it — see invoice payments |
Payment in the job’s header does the same thing as the Payment sub-tab, from anywhere on the job.
The line table
Section titled “The line table”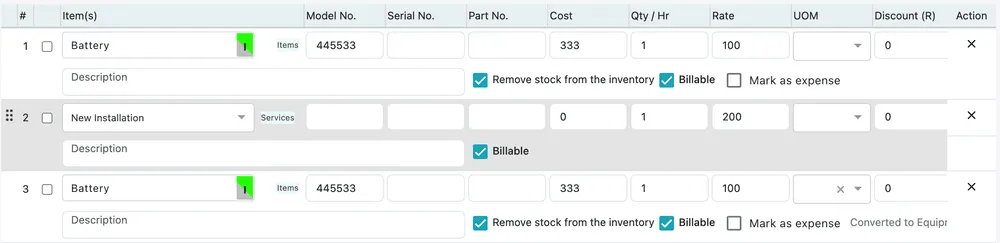
Item / Invoice → Item(s)
Each row is one line, tagged Items or Services so the two are told apart at a glance, and everything on it is editable in place:
| Column | What it holds |
|---|---|
| Item(s) | What it is, with a Description on the line beneath for the detail |
| Model No., Serial No., Part No. | Which exact unit or part it was — the identifiers that make a line traceable |
| Cost | What it cost you. This is what feeds Material Cost in estimated profit |
| Qty / Hr and Rate | How many, and what the client pays per unit |
| UOM | The unit it is counted in |
| Discount | Taken off this line — read as a percentage or as a flat amount, depending on how your account is set |
Cost and Rate side by side are the point of the table: what you paid and what you charge, on the same row, so the margin on every line is visible while you are pricing it.
Three tick boxes sit under each item line:
- Remove stock from the inventory — takes the quantity out of stock when the job saves. Ticked by default on every item line.
- Billable — whether the client pays for it. Untick it for anything absorbed; the line stays as a record of what was used and is totalled separately.
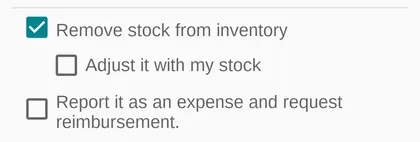
- Mark as expense — carries the line’s cost through to the invoice, so the client is charged for something bought for the job. In the app the same box reads Report it as an expense and request reimbursement, which is how a fieldworker who paid for a part gets their money back. See expenses on jobs and clients.
The same three decisions are made on site, on the app’s own Add Item screen.
The app → a job → Add Item
A fieldworker who fits a part adds it there and it arrives on this table, priced and flagged the same way — with one box more, Adjust it with my stock, for a part that came out of their own van. See adding items in the app.
A line that has been promoted to a tracked unit is marked Converted to Equipment — see Convert Items Into Equipment below. Service lines carry only Billable, since there is no stock behind them.
The handle at the left of a row drags it into a different position, and the ✗ removes it. The tick boxes down the left select several rows at once.
Two buttons add to the list: + Add Item for a part, + Add Job Type/Services for a priced service. Update saves the changes.
Labour
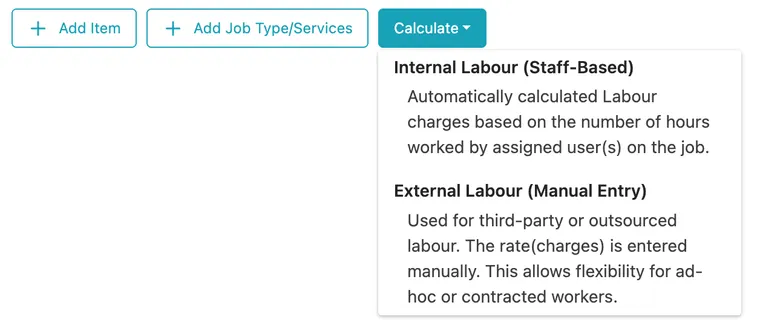
Section titled “Labour”Calculate works out labour and puts it on the job as a line, in one of two ways:
| Option | When to use it |
|---|---|
| Internal Labour (Staff-Based) | Your own staff. The charge is worked out automatically from the hours the assigned fieldworkers actually spent on the job |
| External Labour (Manual Entry) | Third-party or outsourced workers. You enter the rate yourself, which leaves room for ad-hoc and contracted people who are not on your payroll |
Item / Invoice → Calculate
Internal labour depends on the hours recorded in completion detail, so it is worth running after the job is finished rather than before.
The totals
Section titled “The totals”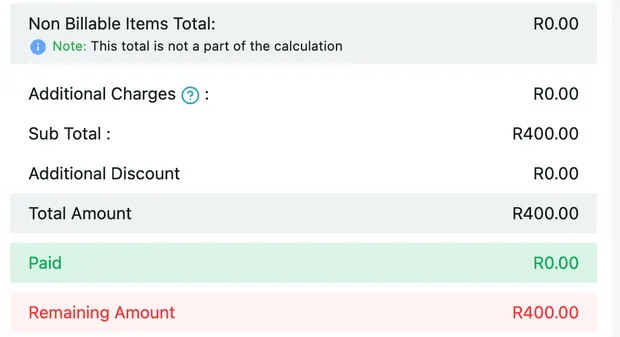
Item / Invoice → totals
The panel on the right adds it all up:
- Non Billable Items Total — what the non-billable lines came to. It is shown for your information and, as the note beside it says, is deliberately not part of the calculation.
- Additional Charges — anything on top that is not a line of its own.
- Sub Total — the billable lines added together.
- Additional Discount — a reduction on the job as a whole, as against the per-line discount in the table.
- Total Amount — what the client is being asked for.
- Paid and Remaining Amount, once money has come in.
Hourly Invoice at the top of the tab shows the hours being billed where the job is charged by time rather than by line.
Purchase orders
Section titled “Purchase orders”Purchase Order(s), with + Add PO, is for material bought in specifically for this job. It opens the ordinary purchase order form — see creating a purchase order.
Recording it here ties the buying to the job it was bought for, so the cost lands against the right work when you look at estimated profit. Fetch Data on the order fills it from this job, from a quote, or from what the fieldworker asked for on the app — see Fetch Data.
Convert Items Into Equipment
Section titled “Convert Items Into Equipment”Convert Items Into Equipment promotes a line into a tracked piece of equipment on the client’s record. Fitting a compressor as an item records that it was sold and charged; converting it to equipment means it now exists as a serviceable unit with its own model number, serial number, warranty and future service history. Use it whenever what you fitted is the kind of thing you will be called back to.
Tick the lines to promote and press the button; converted lines are then marked Converted to Equipment in the table, so it is clear which have already been done. This is also why the Serial No. and Part No. columns are worth filling in at the time — they come across with the unit.
What the unit carries afterwards is covered in client’s equipment.
Getting to the invoice
Section titled “Getting to the invoice”Nothing has to be retyped at billing time. Everything billable on the job flows into the invoice raised from it, whether you raise it from the Invoice sub-tab, from the Job Action menu, or by pulling several jobs onto one invoice at the end of the month. See invoicing from a job.