Creating a quote
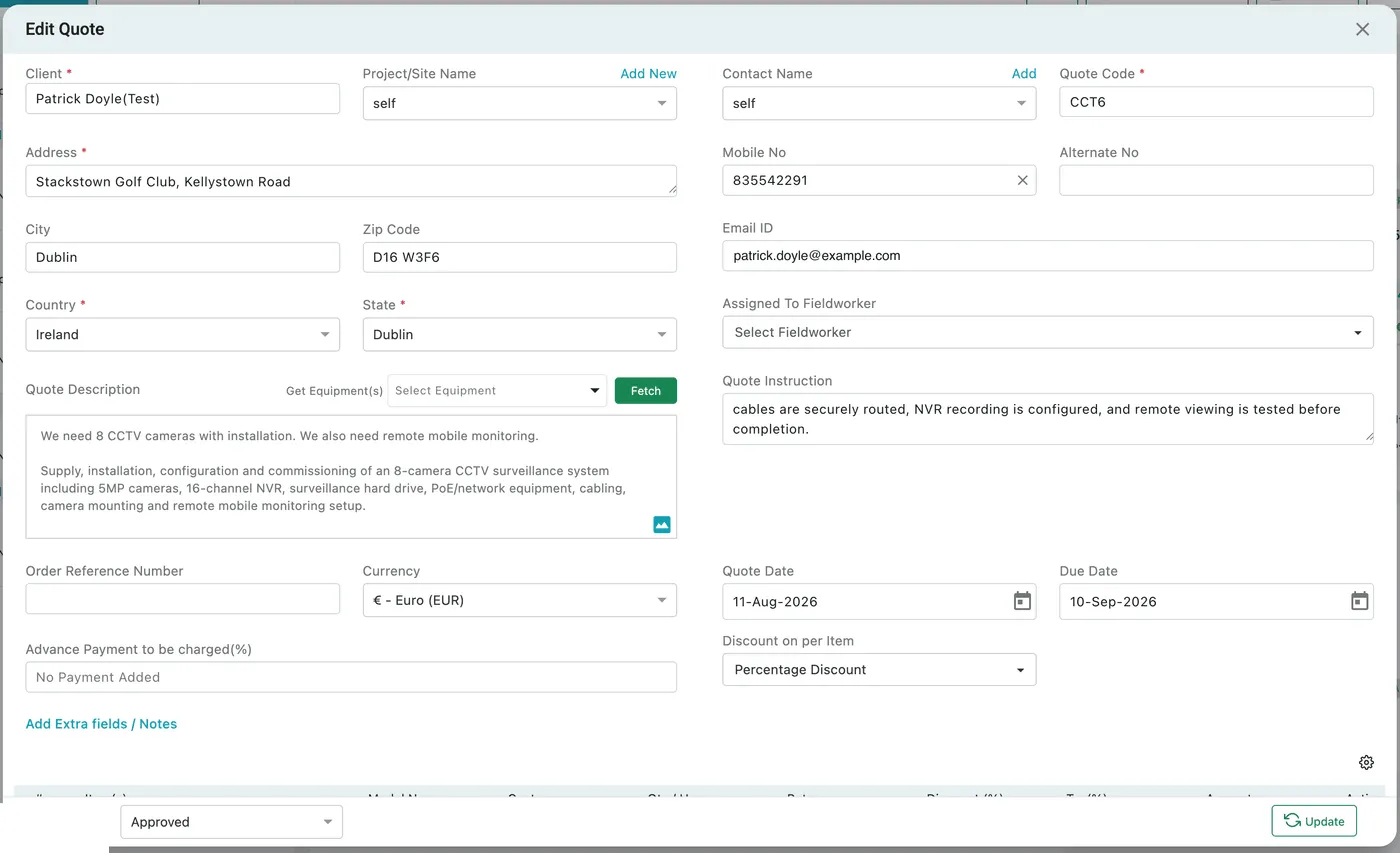
Add Quote, top-left of the quotes list, opens one form that holds the whole quotation: who it is for, when it expires, and what it is for. The lines being quoted are added at the bottom of the same form — those are covered in quote line items.
Quotes → Add Quote
Fields marked with a red asterisk must be filled before the quote will save.
Who the quote is for
Section titled “Who the quote is for”Client is the field that does the work. Pick the client and the rest of this block fills itself in from their record — contact name, address, city, zip, phone numbers and email. You can overwrite any of it for this one quote without changing the client’s record.
- Project/Site Name — which of the client’s sites this is for. It defaults to
self, meaning the client’s own main address, and Add New beside it creates a site without leaving the form. - Contact Name, Mobile No, Alternate No, Email ID — who to reach about this quote. Add beside the contact name creates a new one on the client. The email address here is the one the quote is sent to later, so it is worth checking.
- Address, City, Zip Code, Country, State — where the work would happen.
- Assigned To Fieldworker — who the quoted work is meant for. This is the name that shows as Assign To on the finished quote.
What the quote is for
Section titled “What the quote is for”Quote Description is the client-facing explanation of what you are proposing, and it takes formatting and images rather than plain text alone.
Next to it, Get Equipment(s) saves retyping. Pick one of the client’s pieces of equipment and press Fetch, and its details are pulled straight into the description — so a quote for servicing a specific unit already names that unit.
Quote Instruction is the other half of the pair: notes about carrying the work out, as opposed to the offer itself.
Add Extra fields / Notes opens room for anything this particular client needs recorded that the standard fields do not cover.
Dates, money and terms
Section titled “Dates, money and terms”Quote Date is when the quotation is raised. Due Date is the date it stops being valid — the “valid until” the client sees on the emailed quote.
The 7 Days / 15 Days / 30 Days shortcuts under the due date set it relative to the quote date, so the common cases need no date picking at all. Choosing 30 Days on a quote dated 10 August sets the due date to 9 September.
Quote Code is the quotation’s own reference. It is filled in for you and can be changed, which matters if your numbering has to follow a particular pattern.
Currency defaults to your company’s currency and can be changed per quote, for a client you bill in something else.
Order Reference Number is the client’s own reference — their purchase order — carried through so their accounts team can match the paperwork. It prints on the quote the client receives as PO Number.
Advance Payment to be charged (%) is the deposit you are asking for up front, and it is only ever a percentage of the quote’s total amount — there is no choice of payment type here, just the figure. Leave it empty, or at 0, and no advance is being asked for. What actually comes in is tracked separately, as Received Advance Payment on the finished quote.
Discount on per Item decides how the discount column on each line is read — as a percentage of that line, or as a flat amount off it. Set it before you start pricing lines, because it changes what the numbers in that column mean. Discounting the quote as a whole is a separate thing, and is covered in quote line items.
Adding the lines and saving
Section titled “Adding the lines and saving”At the bottom of the form, three buttons build the quotation itself — Add Item, Add Job Type/Services and Add Package — with the running sub total beneath. See quote line items.
Save creates the quote. It opens on its own page, ready to be sent to the client.
Everything here can be changed afterwards: Edit Quote on the quote page reopens this same form with all of it filled in.