How inventory works
Your inventory is what you buy, keep and fit — cameras, lens modules, cable, housings, consumables. Each of them is an item, and an item carries two kinds of information: what it is and what it costs, and how many of it you have.
The second half is a running balance rather than a number you maintain by hand. Buying adds to it, fitting on a job takes from it, and every movement is written down with a date and a reason. So the item page answers both “what do we charge for this?” and “have we got any?”.
Finding your inventory
Section titled “Finding your inventory”Inventory on the main menu opens into five entries.
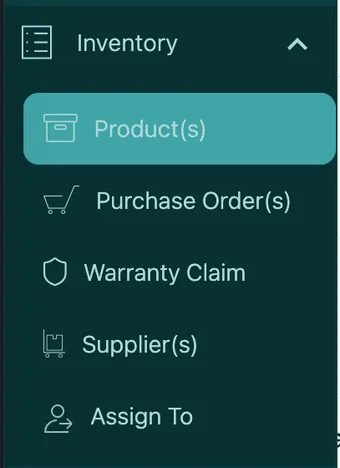
Main menu → Inventory
- Product(s) — the items themselves: what you stock, what each one costs and how many you have. That is what this page covers.
- Purchase Order(s) — the orders you raise on a supplier to buy more, and how the delivery gets into stock.
- Warranty Claim — faulty items going back to the supplier who sold them.
- Supplier(s) — the companies you buy from, and what you owe each of them.
- Assign To — stock handed out to the fieldworkers carrying it.
The item list
Section titled “The item list”Product(s) opens your items down the left of the screen.
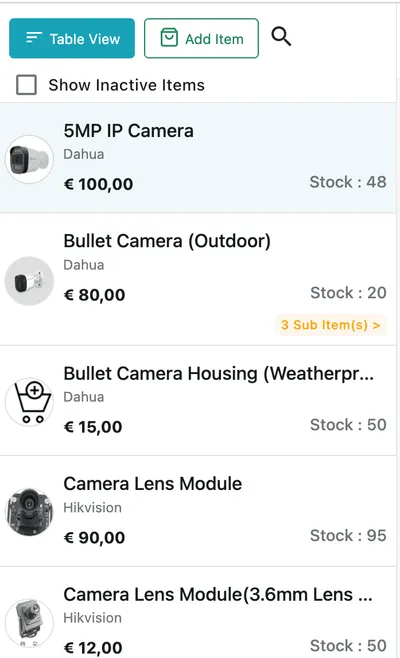
Inventory → Product(s)
Each row carries the item’s picture, its name and brand, the rate you charge for it and Stock, the quantity you currently hold. An item that has parts linked to it also shows a Sub Item(s) badge — see sub items and parts.
Above the list:
- Table View redraws the list as a table. The button is labelled with the view you are going to, so Simple View brings you back. The table is also where Bulk Update lives, for changing many items at once — see bulk updating items.
- Add Item opens the form for a new item — see adding an inventory item.
- The search icon opens a search box over the list. You do not need the whole name — the first two letters of an item’s name are enough to narrow the list to what matches.
- Show Inactive Items brings retired items back into view. Items you have made inactive are hidden until you tick it.
The item page alongside it
Section titled “The item page alongside it”Clicking a row opens that item alongside the list, so you can move between items without leaving it.
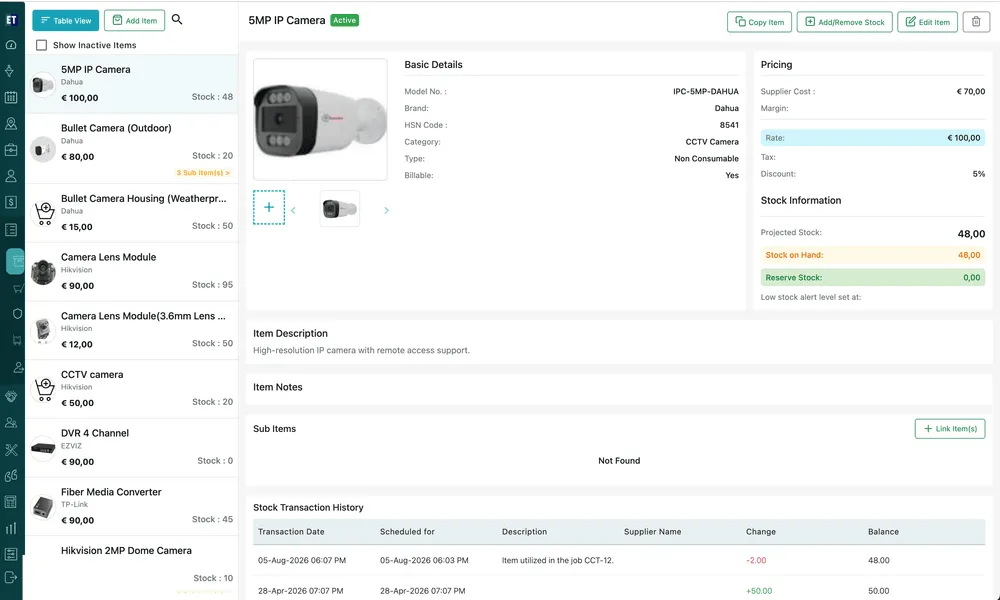
Inventory → Product(s), with an item open
That right-hand panel is the item page — its details, its prices, its stock and its history. The item page goes through it section by section.
Where stock comes from and goes
Section titled “Where stock comes from and goes”An item’s stock changes in three ways, and all three land in the same history:
- You add or remove it yourself — a delivery arrives, or a stocktake finds you have fewer than the system thinks. See managing stock.
- A job or an invoice uses it. Item lines on a job or an invoice carry Remove stock from the inventory, and it is ticked by default — so the quantity leaves your stock when the job or invoice saves, without anyone having to remember. Untick it on a line that should not touch stock. The same box is on the app’s Add Item screen, which is where most of these deductions actually happen: the person who fitted the part records it on site. See job items and services, invoice line items and adding items in the app.
- A purchase order is delivered. What you ordered from a supplier comes into stock when the order is delivered.
Every one of those movements is recorded — what changed, by how much, when, and what it left you with. See stock transaction history.
There is one path that deliberately misses your stock. A part bought for one particular job can be ordered on a purchase order and taken straight onto that job, instead of into inventory: it arrives, it is fitted, and it never sits on a shelf. Nothing is added to the item’s stock and nothing is taken back out, so use it for one-off parts you buy to order rather than anything you keep.
Where to go next
Section titled “Where to go next”Your items
| Page | What it covers |
|---|---|
| The item page | Reading one item — details, pricing, stock figures, description, notes, sub items and history |
| Adding an inventory item | The Add New Item form, field by field: brand and category, pricing and tax, item type, warranty and images |
| Editing, copying and deleting an item | Changing an item, adding pictures, copying it, retiring it and removing it |
| Bulk updating items | Changing many items at once through a spreadsheet — export, edit, import |
| Sub items and parts | Components, assemblies, and linking one item to another |
Stock
| Page | What it covers |
|---|---|
| Managing stock | Adding and removing stock by hand, and what Stock on Hand, Reserve Stock and Projected Stock each mean |
| Stock transaction history | The movement-by-movement record behind an item’s current number |
Buying
| Page | What it covers |
|---|---|
| Purchase orders | The order page — statuses, amounts, payments and sending it to the supplier |
| Creating a purchase order | The order form — supplier, dates, delivery and payment terms, and the items |
| Receiving a purchase order | Marking items received, and whether they go into stock or straight onto the job |
| Suppliers | The companies you buy from, their billing summary and their order history |
After the sale
| Page | What it covers |
|---|---|
| Warranty claims | Claiming a faulty item back from the supplier who sold it |
| Raising a warranty claim | The claim form — reason, client, delivery address and the items with their serial numbers |
| Assigning stock to fieldworkers | Handing items out, moving them between people and taking them back |
Across every item
An item page answers a question about one item. These answer the same questions across the whole store — see how reports work.
| Report | What it answers |
|---|---|
| Current and projected stock | What do I hold, what is promised to booked work, and what should I order |
| Stock Movement (In - Out) | What came in and what went out over a period |
| Inventory Item Detail Report | One item’s movements over a period |
| Sales by Product and Services | What each product and service sold, and what it came to |
Settings behind this module
Section titled “Settings behind this module”- Inventory settings — Product categories, brands, units of measurement and item tax
- Purchase order settings — PO numbering and delivery modes