Invoicing from a job
Most invoices bill a job, and the quickest way to raise one is from the job itself — everything about the client and the work is already there.
Getting to it
Section titled “Getting to it”Open the job, and from its overview choose Item / Invoice, then the Invoice tab. Generate Invoice sits at the top right.

Job → Item / Invoice
The window opens with the client already filled in — name, address, email, contact details and the Bill To block — because the job knows who it was for. What you set before generating is the commercial detail: Invoice Date, Due Date, Order Reference No, Discount Type, Currency and Tags.
From there it behaves like any other invoice. The lines are built with Add Item and Add Job Type/Services — and labour is added on the job’s own Item(s) tab with Calculate, since that is where the worked hours live. See labour is added on the job.
One job, or many
Section titled “One job, or many”An invoice raised this way belongs to the job, and you can see it from inside the job whenever you come back to it.
That changes once an invoice covers more than one job. A combined invoice — the month’s work billed together rather than a bill per visit — does not display inside the job the way a single-job invoice does. The job points out to the invoice covering it instead.
Linking jobs to an invoice
Section titled “Linking jobs to an invoice”An invoice can gather up work rather than being tied to a single job. The Link With control decides which pool it draws from:

Edit Invoice → Link With
- Without Contract Jobs — ordinary jobs that do not belong to a contract.
- Contract Jobs — work under a contract, with the contract’s code shown beside it.
The two are kept apart because they bill differently. Contract work is usually covered by the recurring fee, so it must not be swept onto an ad-hoc invoice by accident.
Fetch & Link
Section titled “Fetch & Link”Fetch & Link is how the work actually gets onto the invoice.
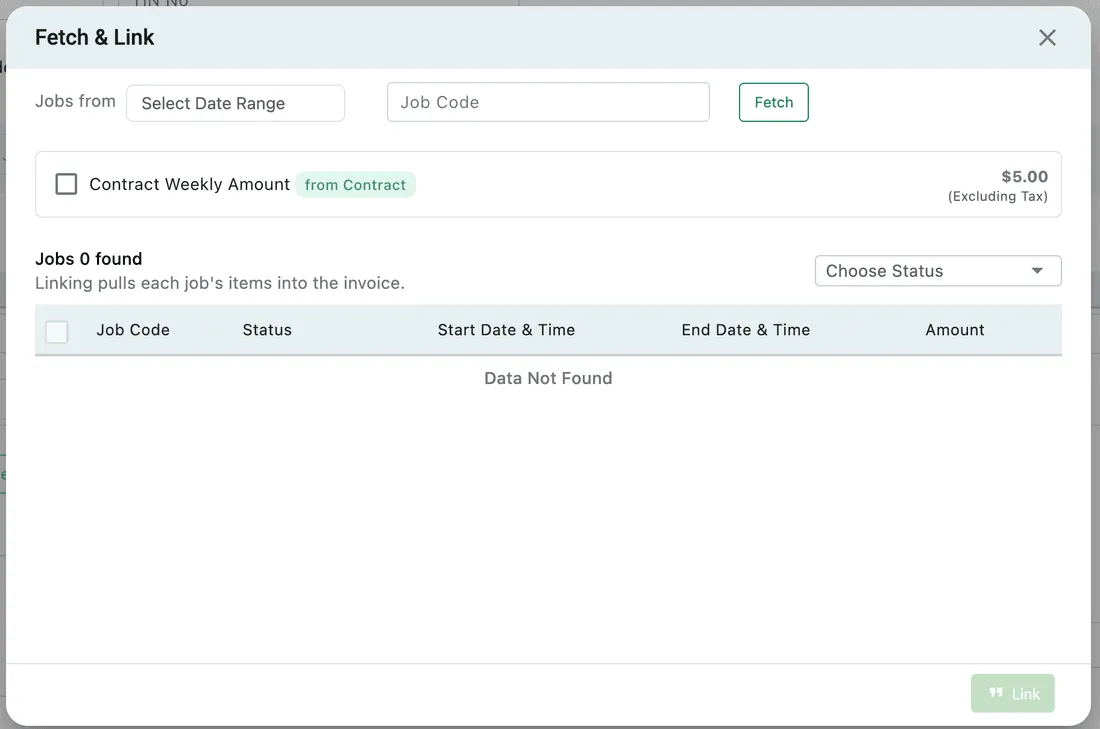
Edit Invoice → Fetch & Link
Search with Jobs from a date range, or by Job Code, and press Fetch. What comes back is two things you can tick, and they correspond exactly to the two ways a contract bills:
- The contract amount — labelled from Contract, with its value excluding tax. On a weekly contract this is the Contract Weekly Amount. Tick it and the fee arrives as a line item of its own: what the client owes for the period regardless of what happened during it.
- The jobs found — each with its Job Code, Status, start and end date and time, and Amount. Choose Status narrows the list to jobs in a particular state, so you can bill only completed work.
The dialog states the rule plainly: linking pulls each job’s items into the invoice. Ticking a job does not add a line saying “job #123” — the items used on that job come across automatically, as real priced lines.
Both can go on the same invoice. The fee as one line, the period’s job items alongside it — which is what a contract invoice usually looks like.
Link adds everything ticked. Anything left unticked simply stays off this invoice.

Edit Invoice → Link With, after linking
This is the same Fetch & Link that a contract uses when you invoice it by hand — see invoicing a contract.
Fetching is available both while creating an invoice and later while editing one, so work can be gathered up as you go rather than only at the start.
Reading an invoice that has jobs on it
Section titled “Reading an invoice that has jobs on it”Once jobs are linked, the invoice shows you which work it covers and which lines came from where.
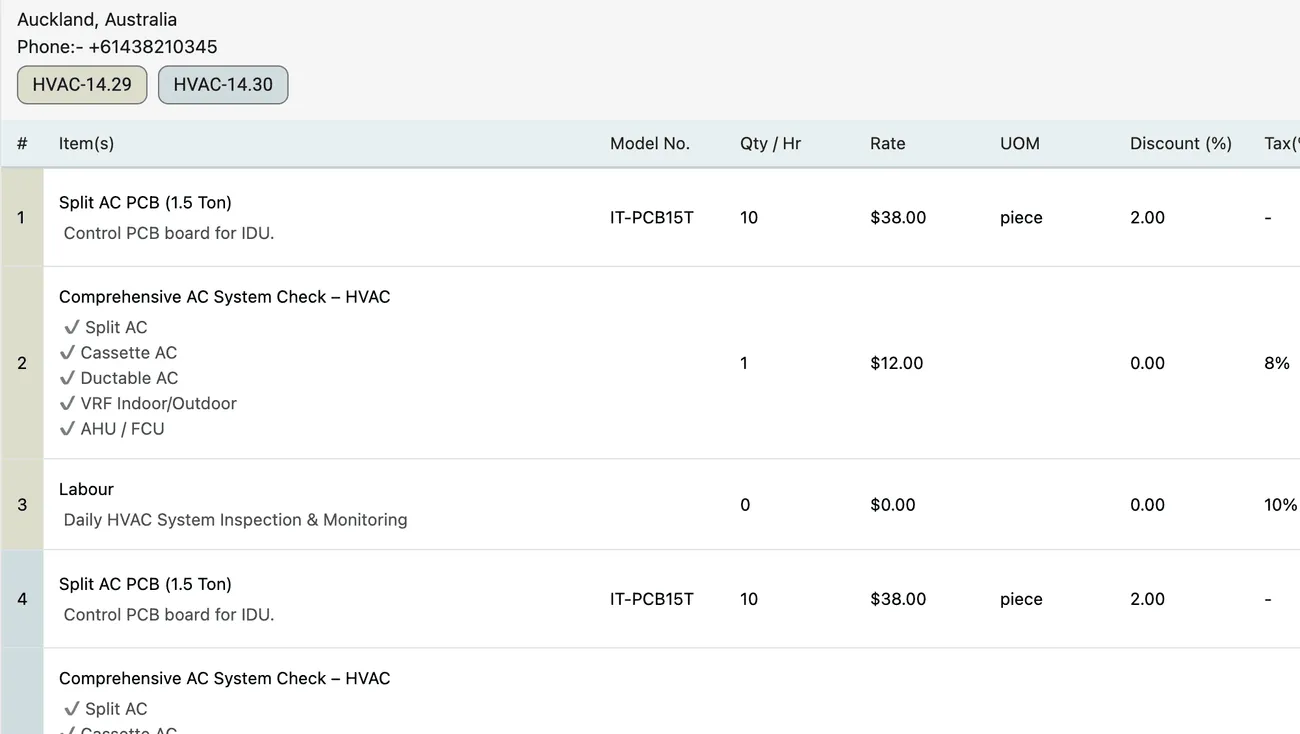
Invoice page → linked jobs and their items
The linked jobs appear as chips above the item table, each showing its job code, each with an × to unlink it again. You do not have to go looking elsewhere to find out what a bill covers — and whether those jobs belong to a contract is visible on the invoice too.
Each job gets a colour, and its line items carry the same colour. With two jobs linked, the items from the first are banded in one colour and the items from the second in another, so you can read straight down the invoice and tell which visit produced which charge.
Standalone items
Section titled “Standalone items”The important part: you can always add your own line items to any invoice, whatever else is on it. A job invoice, a contract invoice, one with six linked lines already — Add Item and Add Job Type/Services still work.
Lines you add this way are standalone items on that invoice. They belong to no job, so they carry no colour band and appear as ordinary individual lines among the coded ones.
So an invoice covering two jobs might read: the items from job one in one colour, the items from job two in another, and a part you sold or a service you are charging for separately sitting plainly among them. The colour tells you, at a glance, which charges came from work and which you added by hand.
A worked example
Section titled “A worked example”An invoice with two jobs linked:
| # | Line | From | Qty | Rate | Discount | Tax | Line total (ex tax) |
|---|---|---|---|---|---|---|---|
| 1 | Split AC PCB (1.5 Ton) | Job 1 | 10 | $38.00 | 2% | — | $372.40 |
| 2 | Comprehensive AC System Check | Job 1 | 1 | $12.00 | 0% | 8% | $12.00 |
| 3 | Labour | Job 1 | 0 | $0.00 | 0% | 10% | $0.00 |
| 4 | Split AC PCB (1.5 Ton) | Job 2 | 10 | $38.00 | 2% | — | $372.40 |
| 5 | Comprehensive AC System Check | Job 2 | 1 | $12.00 | 0% | 8% | $12.00 |
| 6 | Labour | Job 2 | 0 | $0.00 | 0% | 10% | $0.00 |
- Sub Total $768.80 — the six lines. Each PCB line is 10 × $38.00 = $380.00, less 2% = $372.40.
- Tax $1.92 — 8% on each $12.00 service check. The PCB lines are untaxed, and the labour lines are zero.
- Total Amount $770.72.
The job is not changed by invoicing
Section titled “The job is not changed by invoicing”Billing a job does not move it. Its status is what the people doing the work set, and raising an invoice — or failing to raise one — leaves it exactly as it was. The link between the two is recorded on the invoice, as the jobs it carries, rather than as a state on the job.
Sending and payment
Section titled “Sending and payment”Once generated, the invoice can be previewed and emailed straight from the job, with the job card available as an attachment — see sending an invoice. Payment is recorded from the job too, via the $ Payment button — see invoice payments.