Scheduling work on the board: create, edit, move and assign
Work gets onto the board from the waiting panel on the right, by being drawn straight onto the grid, or from the Add menu. What is worth knowing is not how to drag but what a drop means: where you put something is its schedule, and how big you draw it is how long it takes.
The panel of work waiting
Section titled “The panel of work waiting”Down the right is everything that exists but is not on the board.
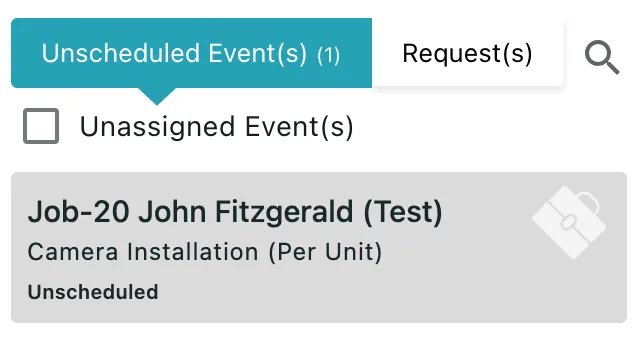
Scheduler → side panel
The first tab holds work that has been created but not placed, and the tickbox beneath chooses which sort you are looking at:
- Unscheduled — it has no date and time.
- Unassigned — nobody has been put on it.
The tab is labelled with whichever you are viewing and carries a count, so Unscheduled Event(s) (1) means one job, appointment or audit is waiting for a slot. Each entry shows its code and client, the services, and its state. The empty state names all three kinds of work at once: No Unscheduled/Unassigned Job(s)/Appointment(s)/Audit(s) Found.
The search icon narrows a long backlog.
The Request(s) tab
Section titled “The Request(s) tab”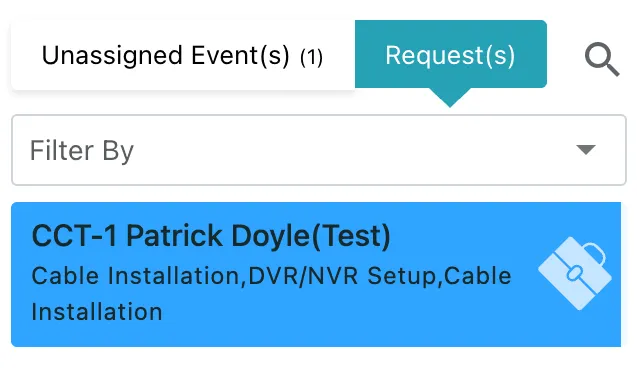
Scheduler → side panel → Request(s)
The second tab lists requests — work asked for but not yet turned into anything — with a Filter By dropdown for narrowing a long list. A request is not work yet: it goes on the board once it becomes a job, an appointment or an audit, which is done from the request itself. See acting on a request.
Placing it: what the drop decides
Section titled “Placing it: what the drop decides”Drag an item out of the panel onto the board, and the drop sets two things at once:
- the row or column you drop on — who does the work,
- where along the time axis you drop — when it happens.
So an unassigned, unscheduled job becomes assigned and scheduled in one movement, with nothing typed. The item leaves the panel as it lands and a confirmation appears: Job updated successfully, or the equivalent for an appointment or audit.
Drawing work that does not exist yet
Section titled “Drawing work that does not exist yet”Drag out a span across empty space and a job is created for exactly that stretch: the size of the drag is the duration. Draw two hours and the job is two hours — there is no end time to work out.
Empty space on a resource row offers Add New Event:

Resources Vertical → empty space on a row
Where you drew it fills in the form before you type anything — the date and time, and in a Resources scheduler the person too, because you drew it on their row or column.
Opening and changing work already on the board
Section titled “Opening and changing work already on the board”Clicking a strip opens that job — the same window you read it in and edit it in.
Work can be moved at any point, including after the fieldworker has started it — a job in progress is reassigned the same way as one that has not been touched.
Dragging a strip that is already placed changes the two things its position stands for:
- onto another person’s row or column — the work is reassigned to them,
- along the time axis — its date and time change.
That is the everyday fix when someone calls in sick, or when a morning job has to become an afternoon one.
Whether anybody is told depends on whether the job has been dispatched.
- Not dispatched yet — nothing goes out. The job is still your planning, and no fieldworker has it on their phone, so drag it to any person, any day, as often as you like.
- Dispatched — moving it to another date or time sends every assigned fieldworker a notification with the new time, so nobody turns up at the old one. Dragging it onto somebody else’s row sends the new fieldworker a notification too.
Nobody needs to ring round after moving a dispatched strip. See dispatching a job.
The right-click menu
Section titled “The right-click menu”Right-clicking a strip is the shortcut for everything you would otherwise open the job to do:
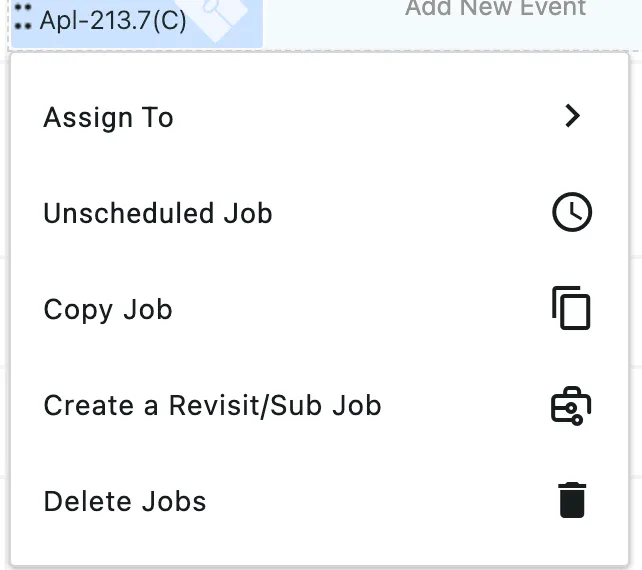
Scheduler → right-click a strip
| Entry | What it does |
|---|---|
| Assign To | Hands the job to somebody else, picked from the submenu. Unlike dragging, this is where you can put several people on one job — tick everybody who is going, then save. |
| Unscheduled Job | Takes it off the board. The job still exists; it goes back to the panel of work waiting until you place it again. |
| Copy Job | Makes another job from this one. |
| Create a Revisit/Sub Job | Raises the return visit, for work that needs a second trip — see create a revisit / sub job. |
| Delete Jobs | Removes the job. |
Delete and unschedule are the two that get confused. Unscheduling takes the work off the calendar and keeps it; deleting takes the job and everything on it. For a visit that is not going ahead but did exist, cancelling or closing the job is better than either, because the record survives.
Changing how long a job takes
Section titled “Changing how long a job takes”Whether you can stretch a strip to change its duration depends on the view, and the reason is what the view is drawn against.
Calendar and Resources Horizontal have a time axis, so a strip’s length means something on them: drag its edge and the duration changes with it, the same way drawing a two-hour span creates a two-hour job.
Resources Vertical does not. There is no timeline behind the rows, so a strip has no length to pull — its times are printed on the strip itself instead. Change them by clicking the strip and editing the time there, or switch to one of the other two views and drag the edge.
Dragging a strip to move it works in every view; it is only resizing that needs the axis.
The Add button
Section titled “The Add button”Add, top-right, is the way in when the work has no obvious slot yet: Add Job, Add Appointment, Add Audit, Add Request and Add Leave.
Add Job, Add Appointment and Add Audit open Create New, whose tabs choose which of the three you are making — the same form used everywhere else, and covered field by field in creating a job. Opened from the board it arrives prefilled with where you clicked; opened from Add it starts empty.
Add Request creates a request rather than scheduled work, for an enquiry taken while you are looking at the week — nothing lands on the board until that request becomes a job, appointment or audit. Add Leave books someone out rather than in; see booking leave.
Sending a crew
Section titled “Sending a crew”The row you drop on is one person, so dragging only ever assigns one name. For a job that takes two or three people, use one of the other two routes:
- Right-click the strip → Assign To, and pick everybody who is going.
- Click the strip to open the job, and choose them in Assign Fieldworker(s) — see creating a job.
Either way the first name is the team leader, and the job then shows on every one of their rows.
Two jobs at the same time
Section titled “Two jobs at the same time”Assign work by hand to somebody who already has a job at that time and the app warns you before it saves. It is a warning rather than a refusal — a double booking is sometimes what you mean, and you can go ahead.
Work raised by a contract’s work pattern is not checked this way. A pattern assigns straight to the fieldworker on it, so two contracts scheduling the same person for the same hour will both do so quietly. The clash shows on the board.
Overlapping slots do not confuse the timekeeping: a fieldworker can only have one job in progress at a time, and starting the second puts the first on hold.
If nothing will drop
Section titled “If nothing will drop”- The job may be assigned to more than one person. A job with a crew on it does not drag in Resources Vertical — it belongs to several rows at once, and a row is a single person. It drags normally in Calendar and Resources Horizontal; switch view, or change the times on the job itself.
- The row you want may be hidden by a filter — check Users and the kind-of-work dropdown. See what the board shows.
- The panel may be showing the other list — unscheduled rather than unassigned, or the Request(s) tab.
Leave is not a reason. An absence is shown rather than enforced, so work drops onto somebody’s day off perfectly well.