Job Report
Job Report is the one most accounts end up living in. Every other report answers a narrow question; this one is the job list itself, asked as a question, and it will cut that list almost any way you need.
That is also the trap. Sixteen filters is a lot of screen, and the way to use it is not to fill it in — it is to set the two or three that matter, generate, and then save it under a name so nobody ever sets them again.
Open it from Add Report — see generating a report.
Nothing is required
Section titled “Nothing is required”Unlike most of the catalogue, no filter here carries a red asterisk. The report opens with Date Range already at Last 7 Days and everything else empty, which means pressing Generate Report straight away gives you the last week’s work, all of it.
So the way in is subtraction, not addition. Start with everything and take away what you do not want.
Clear All, beside Generate Report, empties every filter at once — worth knowing when a set of filters has gone wrong and unpicking them one at a time is slower than starting again.
The filters
Section titled “The filters”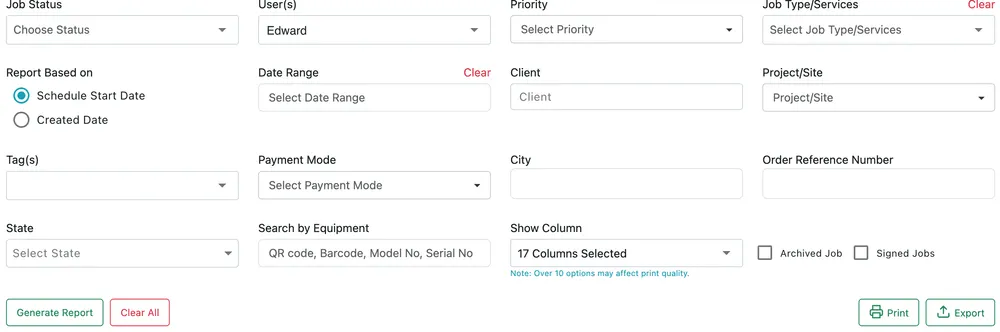
Reports → Job Report
Which jobs
| Filter | Narrows to |
|---|---|
| Job Status | Completed, dispatched, incomplete and the rest — see job statuses. |
| Priority | Urgency, for pulling out what cannot wait. |
| Job Type/Services | The kind of work — see job type services. |
| Tag(s) | Whatever your own tags mark — they are set up in work settings. |
Who and when
| Filter | Narrows to |
|---|---|
| User(s) | Whose jobs, one person or several. |
| Report Based on | Whether Date Range means the schedule or the creation — see below. |
| Date Range | The period. |
Where
| Filter | Narrows to |
|---|---|
| Client | One client. |
| Project/Site | A single site, for a client with several. |
| City and State | Geography, for a business working across regions. |
Finding one particular job
| Filter | Narrows to |
|---|---|
| Order Reference Number | The client’s own reference, which is what they will quote at you on the phone. |
| Search by Equipment | A QR code, barcode, model number or serial number — every job that touched that unit. |
Everything else
Payment Mode narrows by how the work was paid for. Archived Job and Signed Jobs are tick boxes rather than filters: they bring in work that is normally left out, and jobs the client has signed off. Show Column decides which of the seventeen columns the result carries — and the report warns, rightly, that more than about ten of them will not print legibly.
Dated by schedule, or dated by creation
Section titled “Dated by schedule, or dated by creation”The Report Based on radio pair decides what Date Range applies to, and the choice changes what the report means.
- Schedule Start Date counts a job in by when it was due to be done. This is the operational reading — what was meant to happen this week, and did it.
- Created Date counts it by when it was raised. This is the demand reading — how much work came in this week, whatever week it was scheduled into.
A job raised in March for April sits in different months under the two settings, and both are correct. Pick by the question: schedule start for workload, created date for how much is coming in.
What comes back
Section titled “What comes back”Four figures sit above the table:
- No of Jobs — how many are in the result.
- Total Jobs Amount — what the jobs themselves came to.
- Total Invoice Amount — what has been invoiced against them.
- Total Duration — the hours the work took.
The first pair is worth a moment. Total Jobs Amount and Total Invoice Amount are not the same number and are not supposed to be, because invoicing does not map one-to-one onto jobs — one invoice can cover several jobs, and an invoice can carry lines that were never on one. A large gap between them over a period is still worth a look, because the other reason they diverge is work that was done and never billed.
The table underneath is one row per job: the client, the job code, its status, the fieldworkers on it, priority, payment mode, job type, and its start and finish dates. Where a crew is assigned rather than one person, every name on it is listed in the same cell.
Saving it is the point
Section titled “Saving it is the point”This is the report that most repays saving, because it is the one with the most to set up.
Set the filters once — say Job Status: Incomplete, Date Range: Last 7 Days — generate it, then name it in Add this to my reports and save. It joins the list down the left of the Reports section.
From then on it is one click. Nothing to fill in, no dropdowns to remember, no chance of somebody setting a slightly different range and getting a slightly different answer.
The reason this keeps working is that Date Range is relative, not fixed. Last 7 Days still means the last seven days a month from now, so a saved report comes back with this week’s jobs rather than the week you built it in. A fixed pair of dates would have gone stale the following morning.
That is how an account ends up with a shelf of one-click reports built on this one type — this week’s incomplete work, last month’s completed jobs, one client’s whole history — each answering its own question. See saved reports and auto email, which also covers having a saved report arrive by email on a schedule rather than being opened at all.